
 First I had an old falling down building that I took apart and used what wood I could salvage to build a table. I built it 3 feet deep and 4 feet wide by 3 feet tall. I built it that tall because I wanted to be able to have easy access to the fish, and I measured the 100 gallon stock tank that I want in the future and it was 2 feet.
 At Lowes I purchased a plastic mixing tray that is used for mixing concrete and mortar. They have two sizes. Small for $7 and the large for $14.00 I went with the large and I will need another one in the near future.
Then I stopped by one of the box stores and found a deep 30 gallon tote for my fish, and since it wasn't very big, and I wanted constant water level in my fish tank, I also bought a small tote for what I call a nutrients tank. The large tote cost me $7 and the small one cost $4. I think you could could get away with just one large tote, but I felt it was safer to not pump water out of my fish tank just in case something happened and it wouldn't just continue to pump all the water out to leave my fish with some serious breathing problems.
So here we go, this what I did.


First I drilled a 1 inch hole near one end of the mixing tray.
I then wrap Teflon tape around the male end of a 3/4 slip coupling. then I place a rubber bushing over that. You can get a pack of bushings and washers from any hardware store. Its like $2. I place the threaded end from the bottom through the hole in the tray. Then I put another rubber bushing on the threads and screw on the female slip coupling.
I use teflon tape because I tried to just screw the couplings together and the friction just locked them together and I couldn't screw them together all the way, and I couldn't even get them apart.
So now you have the tray with a slip coupling on the bottom and the top of the tray.
Next I measure over to the hole on the bottom of the tray taking in account of the slight slope from the top and applying that measurement to my table. I use a 1 & 3/8" paddle bit to cut the hole so that I have plenty of clearance for the 3/4 pvc.
Here I place about a 4 inch piece of 3/4 pvc pipe in the coupling on the bottom and then place the tray over the hole. That leaves me with a couple inches of pipe sticking out under my table.
Then I place a elbow on the bottom of that pipe. then a 3 inch piece of pipe and then another elbow which now will have a 12 inch pipe placed into that pipe facing down towards the floor.


Now the stem for the siphon. I use a 6 inch pipe and then I slip that into a 1 inch to 3/4 reducer coupling. then the whole stem is placed in the coupling that is in the bottom of the tray.

Then the siphon guard as I call it will be a 4 inch in diameter pvc pipe cut the same as the bell siphon which in this case will be about 9 inches. I then drill half inch holes through out the bottom half of the pipe to allow the water to pass through but to not let our medium to get in the way of our siphon maintenance.

 The fish tanks is next. I come down about 3 to 4 inches and drill 2 holes that are 1 inch.
This allows the water level to stay close to that level. You can use bigger pipe if you like but I just wanted to use the same pipe that I already had. I then use a 3/4 inch thread on one end and a half inch nipple on the other end. I place a rubber bushing around the 3/4 end, stick it through the wall of the tote and then another rubber bushing and then a 3/4 female threaded coupling with a slip end on the other side. Once you thread the couplings together the rubber bushings should not allow water to leak, but you may have to use a wrench to slightly tight them more. Then the slip a five inch long hose onto the nipple. Do all this for both holes in the fish tank
Now I take my smaller tote and mark where the holes should be so that the hoses line up and drill 1 inch holes into that tote. Now I slip the hoses through the small tote and that will allow the water as it rises in the fish tank to over flow into the nutrients tank.
I do want to make a small note. If I was to do it over again, I would just lift the fish tote a little higher off the ground and change out the hoses to just regular pvc that lets the water fall into the nutrients tank. This would save on having different fittings and hoses.
Now I cut a 3 inch pipe to place inside coupling in the fish tank, and add a elbow to that, then I add a 12 inch piece of pipe followed by a 45 degree elbow that should now be resting on the bottom. This will work as a suction as the water level comes up and it overflows to the nutrients tank it sucks the trash off the bottom, now keeping the fish tank clean. Which I think is pretty cool. Anything to keep the maintenance down. Do this for both holes in the fish tank.
 The pump I use is just a simple submersible fountain pump that you can find at Harbor Freight or Big garden centers. The one I found was actually from lowes that was on clearance when the season started to get cold. I use a half inch hose to connect the pump to a half inch pvc that then goes to my bedding trays. You can skip that step and just run the length of hose strait to the bedding tray if you like. But since I plan on putting valves to control the flow later, I chose PVC.
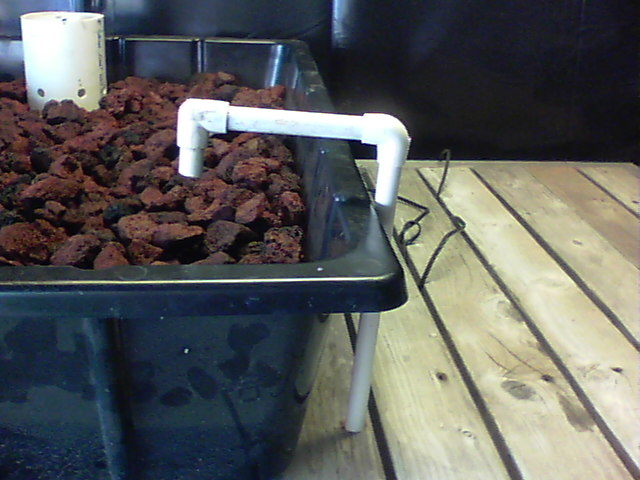 I am using Lava rock for the first base and then will add expanded clay to the last 3 inches of my bedding trays. I could have went to the creek and got some creek pebbles, but It was just easier to go to the garden center.
 The system was then filled with water and ran for a couple days to make sure the chlorine was out and it was going to work ok before I placed the fish. For testing purposes and it was also going into winter I decided to go with local fish to start and then change them out to Tilapia come spring. You can read how to properly cycle your fish here on the blog if you are wanting to do it correctly.

The fish I chose were simple perch, and one crappie just happened to get caught so its in the tank too.
I feed them worms and crickets twice a day, they are very active.
This will I think pacify me for now until I can build bigger. I have so many plans for the system I sometimes lose sleep. Buts that's what makes it nice. There is no wrong way to do it, just a better and more efficient way in doing it.
Please like share and subscribe to my blog and You-Tube Channel.
Any Question on what I did, feel free to ask.
I will add a video and some more pics soon.


